Desserts for Cookouts

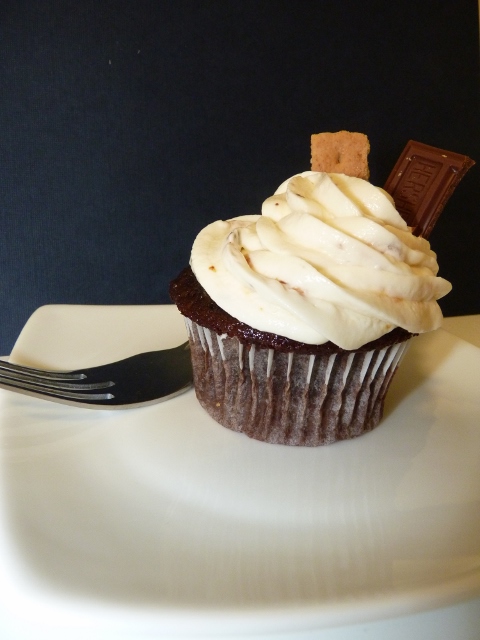
As usual, when Jas told me that his coworker was hosting a cookout, my first thought was what I could bring. Of course, I was excited to finally meet some of the people he works with, but I love having occasions to try out new recipes. Since Jas frequently brings my cupcakes to his office, he said I just had to bring them to the cookout. After checking with the hostess that dessert was ok to bring, I started thinking about cookout cupcakes.

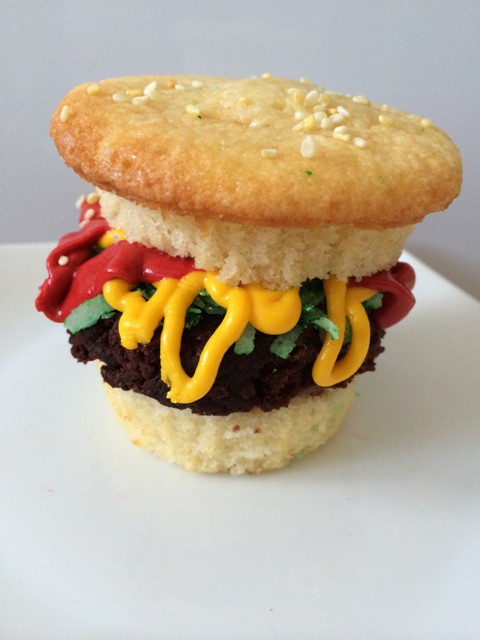
Once I scoured Pinterest for ideas, I found a few pictures of hamburger cupcakes and settled on those. I discussed (several times) with one of my friends whether the “hamburger” should be frosting or brownie. The brownie looked more authentic but I love frosting, so I didn’t want the frosting to cake ratio to be off. I finally settled on using the brownie, but hollowing out the lid of the cupcake and filling it with frosting.

First I got all my supplies ready by making one batch of butter cupcakes, and one batch of Ghirardelli brownies (my favorite boxed version!) Since I wanted the brownies to be thinner to fit better in the cupcake, I took what should have been one 8×8 pan, and spread it into two. After cutting out the brownies into circles, I ended up with 18 “hamburgers”, and lots of tasty leftover corners to snack on. Since I had 30 cupcakes, this left plenty of taste testing for those too!

After making one big batch of buttercream, divided into plain, chocolate, and two dyed red and yellow, I was ready to start. I unwrapped all the cupcakes, cut them in half and placed a brownie on a dollop of frosting on the bottom “bun”.

photo 1

Next came the lettuce (coconut dyed green) topped with ketchup and mustard frosting. Then I scooped cake out of the top “bun” and filled it with white frosting. This was mainly to have extra frosting, but if it leaked a bit, I figured it’d just look like mayonnaise. Stick the lid on top, and add a few seasame seeds, and you’ve got a hamburger cupcake!

photo 4photo 2a

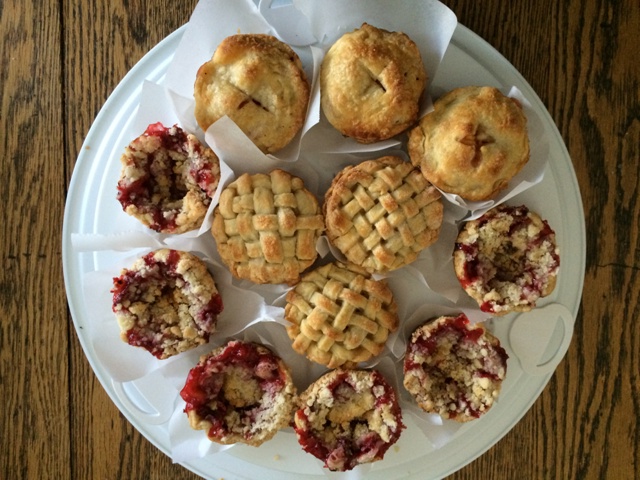
I can never bring just one thing though, so I also decided to make mini pies in a cupcake pan. I thought this would be difficult, but it was much easier than I expected, and a great way to use up leftover fruit! I had two apples, two peaches and a pint of strawberries, so I figured I’d just see how many pies I got out of that. I already have recipes for all three of those pies, so I just scaled the filling down based on how much fruit I had. I also precooked the apples so that the pie crust wouldn’t burn while the apples were still crunchy.

I saw a tip online to line the cupcake pan with strips of parchment paper, and I would highly recommend this. It made it a breeze to lift them out of the pan, and also allowed me to peak at the bottom to check if the crust was browned.

photo 2b

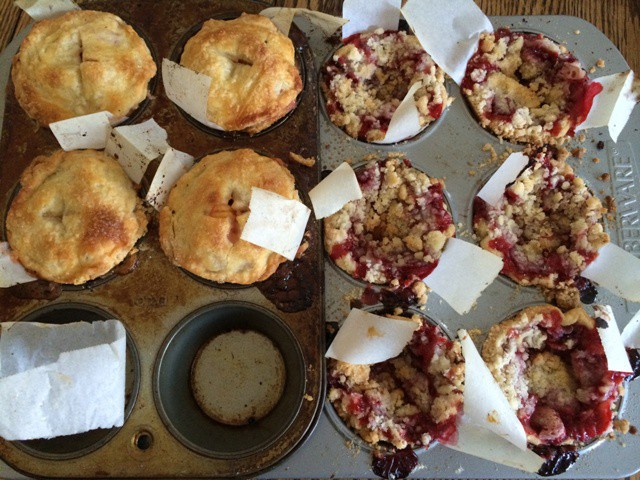
(Peach left, strawberry right)

I think it was a good idea as well to put a different top crust on them to help people know which pie was which. Since you don’t have to cut into them, it’s hard to tell! I loved bringing these pies along and not having to worry about needing a knife and pie lifter. I think it prompted people to eat them too since it’s less hassle then trying to find a plate. I will definitely be making mini pies again!

photo 5b

Recycling Furniture

While it is now almost May, and I actually started this bench last August, I only recently made the cushion to complete it. Soon after moving into our apartment, I knew I wanted to buy something to put in our entryway. Preferably a bench and a secretary. Jas (probably wisely) suggested I not buy any furniture just to accommodate our current space when we don’t know how long we’ll be staying. So when I saw an idea on Pinterest to make a bench out of an old twin bed frame, I thought it’d be a great idea to try. Especially since I knew my mom had a few twin beds hanging around I could snag for free.

In August, Jas and I went camping with my mom and step-dad up north in Vermont. I convinced my mom to bring me one of the bed frames that I thought would work great for my plan. A few weeks later, my dad came out to Boston to visit us, and I thought it’d be a great project for the two of us! The first task for the project was to sand down the frame, because I wanted a darker wood to match our living room. This was the part of the project that I disliked the most, partially because sanders are quite loud and hard on the arm, but mostly just because it’s time consuming. I think to do the best job, we probably should have sanded the pieces more than we did, but my dad and I decided that taking off the shine of the wood was good enough for us.

After looking at the bed frame we had, we quickly realized that we couldn’t build the bench the way it was done in the example I found. They used the slat at the bottom of the headboard and footboard to lay the seat, with the top of the footboards for the arms. However, the gap on the headboard and footboard on my bed frame did not match up, and if we had cut the legs off the headboard to make them match, we’d have a child’s height bench. So after much discussion, our new plan was to cut off the curved part of the footboard, and lay the seat on top of that. Luckily I had bought a jigsaw for a different project, the circular saw I already had just wouldn’t cut it for this type of work! Off we went to Home Depot to buy wood for the seat, long screws to hold it together, and wood plugs to cover them, hopefully making our final product look more professional as a result.

P1060507 (638x850)

After putting the headboard and footboard together, we realized the bench looked a little silly with no arms. While it’s not the best wood, we were a bit tired of going to the Home Depot, so I drew freehand arms on a piece of particle board I already had at home. I also had the idea to use the curved bit we cut off the footboards to add a bit of decoration to the bottom of the seat. Once those were all attached, we had a bench! And sadly, it was time for my dad to go home. Which left me with the job of staining it. Needless to say, I’m a bit of a procrastinator, so I waited till the last nice weekend in October to do it outside. It was a little chilly, and slightly rained on me, but I got two coats of beautiful Kona Brown stain on the bench.

P1060510 (638x850)

Shortly thereafter, I bought pretty purple fabric, the foam and cording to make the bench cushion. Once I got the fabric home though, I realized the purple, which did match what I have in the living room, blended right into the bench. So I decided to go out and get ivory fabric instead. This took me about 5 months to get around to. In the meantime, the bench worked great all through winter as a place to put on our boots, although not quite as comfy as it could be!

P1060513 (640x480)

I finally made time to stop by the fabric store again, and lucked out by finding fabric that matched my pull-out couch for $2.99! Since I had all the supplies, I was able to get the cushion done on a Sunday afternoon. It was an easy box cushion, although I made it harder on myself by adding cording for a little decoration. I saw a post on Pinterest about wrapping the fabric around the cushion in one whole piece instead of cutting it, and that’s the idea I followed. I think that idea worked well for her because she didn’t use cording. I probably would have spent the same amount of time if I had cut strips, but oh well. I secured the back with Velcro instead of a zipper, because I didn’t want to struggle to put the foam into a 24” zipper hole. Plus, Velcro made the construction that much faster. Once it was finished, I wrapped the foam in batting for further cushioning and squeezed it into the new cover! Once it was on the bench I realized it is probably a little too big for the seat, but I like the way it looks, and it feels very nice to sit on!

P1060512 (640x480)

Maybe one day I’ll actually make my projects all in one go, but even though this took me a long time to complete, I’m very happy with how it looks in our apartment, and I can see using it in future houses. Now I just need to find a coat hook with a mirror to put in the space next to it.

P1060505 (638x850)

Settling In

While I lived on my own for over 5 years before moving to Boston, this is the first time I really feel like I can do all the things I want to do with a house. I think it is mostly due to the fact that in Michigan, while I loved my place, I lived in an apartment building. Now we live in the first floor of a two unit house. So we have a front door with a porch, a flower potter out front, a little yard, and overall, it just feels more like a house than an apartment. Because of this, I have gotten a little Pinterest crazy.

First it started with the interior and curtains. I made new curtains with blackout fabric for our bedroom to match the new bedding set we got for our wedding. The curtains themselves took maybe two hours to make. It took me two months to hang them though. Since we live in an old house, I’m not used to the construction style, so when I went to put anchors in for the curtain rod, I was baffled by fact that I couldn’t get the anchor to go into the hole I drilled. While I could fit an entire pinky into the hole, every time I tried to put the anchor in, it bounced back at me. As a temporary solution so the curtains wouldn’t get wrinkled, Jaz and I taped the curtain rod to the top of the window frame. And then I forgot about it. Finally in October I bought a different kind of anchors from Home Depot, the super heavy duty bolts with the wingy thing on the back, made an even bigger hole, and got the curtains up.

P1060072 (472x640) 

After that fiasco, I got a bit discouraged on the curtain making, and all the fabric I bought for the kitchen windows is still sitting in my craft room. But with fall starting, I had all these grand plans to decorate outside for Halloween. I wanted to make a big sign for the porch, put out hay bales, and decorate inside. Well that didn’t happen. I did make a fall “wreath” for the door though, and put out some pumpkins. Since our door has an oval window, I knew I couldn’t do a typical circle wreath, so after so Pinterest/Googling, I found out there is a swag wreath which would fit the shape better. After collecting the supplies, I was happy to find that the swag wreath took me all of 20 minutes to put together. I bought a broom looking leaf bunch, and then wound a couple leaf garlands through it to give it more volume. I’m pretty happy with how it turned out, and now I want to try and make one for every season.

fall swag (478x640)

As Christmas came along, I got a little too into home décor magazines, and decided that I wanted a magazine Christmas house. This involved plans for changing the decorations of all the rooms of our house so that I could cover up the extra colors come the Christmas season. Needless to say this has also not happened. I do like the idea for the future, I just don’t think I’ll get it all done at once. Plus Jaz keeps telling me not to make all sorts of curtains for a place we don’t intend to stay more than a year or two. So instead of redecorating everything, I made some crafts that I can keep every year for Christmas décor, like these felt/yarn trees and a Christmas door swag.

Christmas trees (480x640)       P1060073 (480x640)

I think my favorite craft so far from Christmas though has been the Advent calendars I made for both of us. I saw this idea online somewhere to make a reusable calendar out of match boxes, and just needed the match boxes to put it all together. Thankfully my grandma found me a bunch, and brought them to me at Thanksgiving! I’m very happy with how they turned out, and I think it’ll be fun to fill with candy and keep every year.

advent calendar 2 (640x640)

Slowly but surely, we are settling into our new home here. While I haven’t gotten to all the projects I want to do (especially since I keep coming up with more!), it is really nice feeling like we have a house without the stress of owning one yet. Although I am counting the days till the end of football season in the hopes our upstairs neighbors will not like hockey or basketball. (Jaz and I cheered when the Patriots lost in the AFC championship last weekend, not because we cared about the Broncos, but because we wanted to not worry about our ceiling falling down on Superbowl Sunday.)

P1060067 (640x480)

New Neighbors

We knew we were getting new neighbors upstairs at the start of this month, and in an effort to make them like us so they’ll be nice to our ears, I decided to make cupcakes. And let’s be honest, I’ll use any excuse I can get to make cupcakes. Our landlord informed us earlier in the summer that they’d be college students. Immediately I wished for grad students. Preferably girls. Everyone knows that girls don’t party at home if they are inclined to be partiers. Only guys don’t care what their house looks like. And grad students are always much tamer than undergrads. I was ideally hoping for a college student who was like me.

Shortly after moving in, my mom (who had come out to help me move) heard rumors from the neighbors about our house. It was confirmed when Jaz and I met a lady down the street that our house is known as “the yellow house”. Having a name is never a good thing. Apparently the previous tenants over the last 5 years or so have been quite bad. Including having open fires in the side yard, weekend long parties, and numerous police reports. When we moved in, it seems everyone was quite glad that the house was taking a turn for the better. And when the upstairs people were kicked out shortly thereafter, it seems it wasn’t just us waiting to see who the new tenants would be.

So back to the cupcakes. I decided straight off the bat that they should either be chocolate or vanilla to be the most generic. I had bought vanilla wafers to make banana cupcakes a week or so ago, but I figured that probably wouldn’t be the most popular flavor. After combing my Pinterest board, I made the unheard of decision to do a repeat. I don’t usually like to make things twice because I always have so many new ideas that I want to try. However, these cupcakes needed a redemption.

The last time I made s’mores cupcakes was for the first meeting of Jaz’s and my parents. Like most of the normal, pre-marriage milestones in a relationship, Jaz and I hit this one fairly late. It came almost a year after we were married, right before our Michigan wedding. I will use any gathering as an excuse to make new things, so I found these s’mores cupcakes that I wanted to try from Baker’s Royale.  I have no idea what happened to the cupcake batter, but I could tell before I even put it in the oven that something was wrong with it. It made nowhere near as much as it should have, and it had the consistency of brownie batter. Which is pretty much what they turned out like, dense little brownies in a cupcake wrapper. With no time to try again, I went ahead with decorating them. I burnt my finger many times toasting the frosting. (I really should buy a torch, doing these things with an average lighter is not easy!) But I thought they turned out super cute, which at least helped with the fact that the “cupcake” was totally stuck to the wrapper.

IMG_0834 (640x480) IMG_0835 (640x480)

Luckily I had made backup chocolate cookies, which were well received, and the family get-together went off without a hitch. (Minus the fact that Jaz’s family got turned around on the way to my parents and ended up taking an extra hour to arrive!) Jaz and I had come up with a game where the opposite family had to answer trivia questions about us, and everyone had many laughs over it.

From this experience though, and a few prior, I finally learned my lesson. If a Pinterest recipe calls for a basic chocolate or yellow cake recipe, I need to just use recipes that I’ve tried and enjoyed. Oftentimes I’m making something to take somewhere, and I can’t afford to try untested cake recipes when I have a lot that are fabulous in my recipe box. So for the neighbors, I found an old chocolate cake recipe and combined it with the marshmallow frosting recipe from Sweetopolita that I had used making Jaz’s birthday cake from the last post.

Saturday morning I made the cupcakes, and immediately encountered a problem with the frosting. It was too runny to pipe onto the cupcakes. It is very tasty frosting, but made more for a filling than for decoration. Even after adding at least twice as much powdered sugar, I couldn’t get it to hold up. So I abandoned the cupcakes to go out to the Hanson concert for the evening, figuring I’d deal with it later. Once I arrived home however, I discovered the new college kids had moved in (Jaz thinks it’s three boys and a girl) and were already having a party. So even after discovering that once chilled, I can pipe the marshmallow frosting, I’m debating whether the new neighbors deserve any cupcakes. We shall see. In the end though, the remade s’mores cupcakes may not be quite as cute as the originals, but are much tastier!

P1060046 (480x640)